Mastering Ir Intensity on Blink Cameras: A Comprehensive Guide
Introduction
In the realm of home security, Blink cameras have established themselves as a popular choice owing to their reliability and innovative features. One such feature is the Infrared (IR) Intensity, which has drastically enhanced the way these cameras function in low-light conditions. However, to maximize the effectiveness of your Blink camera, mastering the IR Intensity feature is crucial. In this comprehensive guide, we'll delve into the importance of IR Intensity, how it affects your Blink camera's functionality, and how to adjust and tackle common issues related to IR Intensity.
What is IR Intensity?
Defining IR (Infrared) Intensity within the context of Blink cameras is vital to grasp the function and optimize its usage. In simpler terms, IR Intensity refers to:
- The strength of infra-red light that the camera employs for capturing under low-light conditions.
- The capacity of this light to illuminate the scene for the camera when capturing images in darkness.
The correlation between illumination power and IR intensity is direct. Essentially:
- A high IR Intensity guarantees a vibrant illumination, offering the camera an extended visual range in low-light situations.
- On the other hand, lower IR Intensity results in more subdued illumination, making it apt for monitoring closer quarters or smaller areas.
To summarize, IR Intensity plays a crucial role in determining how conspicuously your Blink camera can observe in dark conditions, offering clarity and accuracy to images and videos captured.
Why is IR Intensity Essential in Blink Cameras?
Adjusting the Infrared (IR) Intensity in Blink cameras can noticeably improve their performance and functionality. Here are some compelling reasons for mastering this critical feature:
- Enhanced Low-Light Imaging: The primary purpose of IR Intensity is to illuminate areas in low light or complete darkness. By adjusting the intensity appropriately, you can enable your camera to capture clear images regardless of lighting conditions.
- Optimized Battery Life: Proper management of IR intensity can greatly extend your Blink camera's battery life. While a higher intensity allows for improved vision in darkness, it can also drain battery power more quickly. By lowering the intensity when powerful lighting isn't necessary, you can conserve battery life.
- Customization and Flexibility: IR Intensity adjustment gives users a higher degree of control over their surveillance systems. If you're monitoring a large open area, set the IR Intensity to high for an extended vision range. For smaller indoor spaces, a low intensity may be sufficient and more energy-efficient.
- Improved Motion Detection: Blink cameras utilize Passive Infrared (PIR) sensors to detect motion. Altering the IR Intensity can influence the sensitivity of these sensors, thereby affecting the camera's motion detection capabilities.
Understanding and harnessing the power of IR Intensity can ensure you're getting the maximum benefit from your Blink camera system. It allows for better image capture, longer battery life, personalized setting, and enhanced motion detection, making it a vital part of an effective home surveillance setup.
How Does IR Intensity Impact the Functionality of Blink Cameras?
The Infrared (IR) Intensity is an essential factor that significantly shapes the functionality of Blink cameras. Understanding how it influences the camera's performance can empower users to customize settings, according to their unique security requirements and preferences. Below, we dissect how IR Intensity affects different aspects of Blink cameras:

1. Image and Video Quality: IR Intensity has a direct correlation with the clarity of images and videos captured. A higher intensity setting can not only light up larger spaces but also ensure detailed and sharp images in low-light conditions. On the other hand, a lower setting is optimal for smaller spaces, enabling clear videos without wasting battery resources on excessive illumination.
2. Battery Life: The power level of the IR light can significantly affect battery life. Keeping a high IR Intensity will tend to deplete the battery faster, while a lower setting helps conserve it, thereby prolonging battery life. It becomes a crucial factor, especially for cameras running on batteries.
3. Motion Detection: Blink cameras employ Passive Infrared (PIR) sensors for motion detection. The IR Intensity settings can indirectly impact the efficiency of these sensors. It's essential to balance the intensity to ensure precise and consistent motion detection.
4. Area Coverage: The IR Intensity level can also determine the scope and range of coverage. More intense light has a broader spread, suitable for surveilling larger areas, while less intense IR light is sufficient for smaller zones.
In summary, manipulating IR Intensity isn't just about adjusting the brightness. It impacts image quality, battery usage, motion detection, and range of coverage, all key aspects of your Blink camera's performance.
How to Adjust IR Intensity on Blink Cameras?
Modifying the IR intensity setting of your Blink camera is essentially a simple process that doesn’t require any profound technical expertise. Follow the steps outlined below to optimize your camera's view in various lighting conditions using Blink's IR intensity settings.
1. Begin by opening the Blink application on your smartphone.
2. Navigate to the settings page dedicated to the specific camera whose IR intensity you wish to adjust.
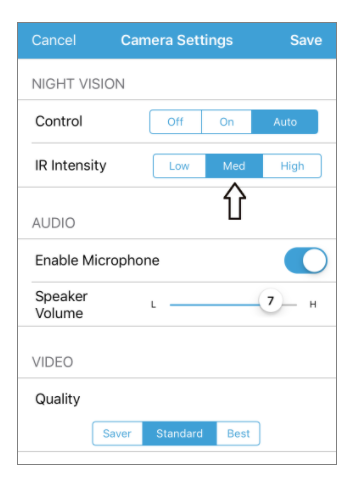
3. On this page, you should find an option labeled 'IR Intensity'. Tap on it.
4. A pop-up screen with three options: Low, Medium, and High will surface. These options allow you to set the intensity of the Infrared light according to your needs.
- Low: Ideal for small, indoor spaces where less IR light is required. This setting also helps conserve your camera's battery life.
- Medium: This balanced option suits moderately sized areas that need moderately bright IR light for clear visibility.
- High: When large, dark spaces need monitoring, a higher IR intensity setting provides stronger illumination in the visual field.
5. Click on your preferred level, and then save the settings to confirm the changes.
For more advanced users who want to customize their IR intensity further than the preset options allow, manual IR intensity control can be a suitable approach. It's important to note that this necessitates a degree of technical knowledge and may require additional steps beyond those mentioned above. Online guides and tutorials come in handy here, presenting a detailed walkthrough of this process.
Remember, the core principle when tinkering with the settings is to ensure they align with both the spatial dimensions and lighting conditions of your monitoring space. Striking the perfect balance between the two can enhance surveillance capacity, bringing you closer to an optimal security experience.
Dealing with Common IR Intensity Issues on Blink Cameras
Managing the IR Intensity on Blink cameras effectively can help prevent an array of common issues. So, if you're facing any difficulty with your camera's night vision or power consumption, the following points may come in handy:
- Unsatisfactory Night Vision: If your Blink camera isn't delivering clear images during the night, it may point to an issue with the camera’s IR intensity level. In such instances, try increasing the IR Intensity via the settings in your Blink app. This should help enhance the camera's performance in low-light conditions.
- Excessive Power Consumption: If the camera seems to be draining power too quickly, it might be due to a higher IR intensity setting than necessary. Consider decreasing the IR intensity, particularly if the camera is monitoring a small area, to conserve battery life.

- Regular Firmware Updates: Ensuring your Blink camera has the latest firmware updates installed is crucial in maintaining optimal IR performance. Updates often come with improvements and bug fixes that can resolve issues related to IR intensity.
- Camera and IR LEDs Positioning: The placement of your Blink camera and its IR LEDs can impact the effectiveness of the night vision. Make sure the camera is appropriately positioned, with the IR LEDs oriented towards the area you're trying to monitor.
These troubleshooting steps will ensure optimal use of your Blink camera's IR intensity feature.
Conclusion
Mastering the IR Intensity function on Blink cameras can significantly enhance your home surveillance experience. Knowing how to adjust and troubleshoot IR Intensity can lead to clearer images, better power management, and more customized security settings. This guide serves as a comprehensive look into understanding and controlling this critical feature of Blink cameras.
Related FAQs about what is ir intensity on blink camera
What is the role of the IR Intensity feature in enhancing the performance of Blink Cameras?
The IR Intensity feature plays a crucial role in enhancing the performance of Blink cameras. It aids in capturing better images in low-lighting conditions by providing necessary illumination. Moreover, with the right balance, it also extends the camera's battery life, adjusts motion detection capabilities, and customizes the area of coverage.
How can I adjust the IR Intensity manually on my Blink Camera?
Adjusting the IR Intensity manually on your Blink Camera can be done via the Blink application. Find the option labeled 'IR Intensity' in camera settings. Here, you'll see Low, Medium and High options – choose what best suits your requirements. Remember to click save before closing out.
What are some troubleshooting techniques for common IR Intensity issues on Blink Cameras?
Common troubleshooting techniques for IR Intensity issues include checking if the night vision isn't clear and increasing the IR Intensity if required, reducing intensity for small areas to conserve battery, ensuring up-to-date firmware, and proper positioning of the camera and its IR LEDs.


